
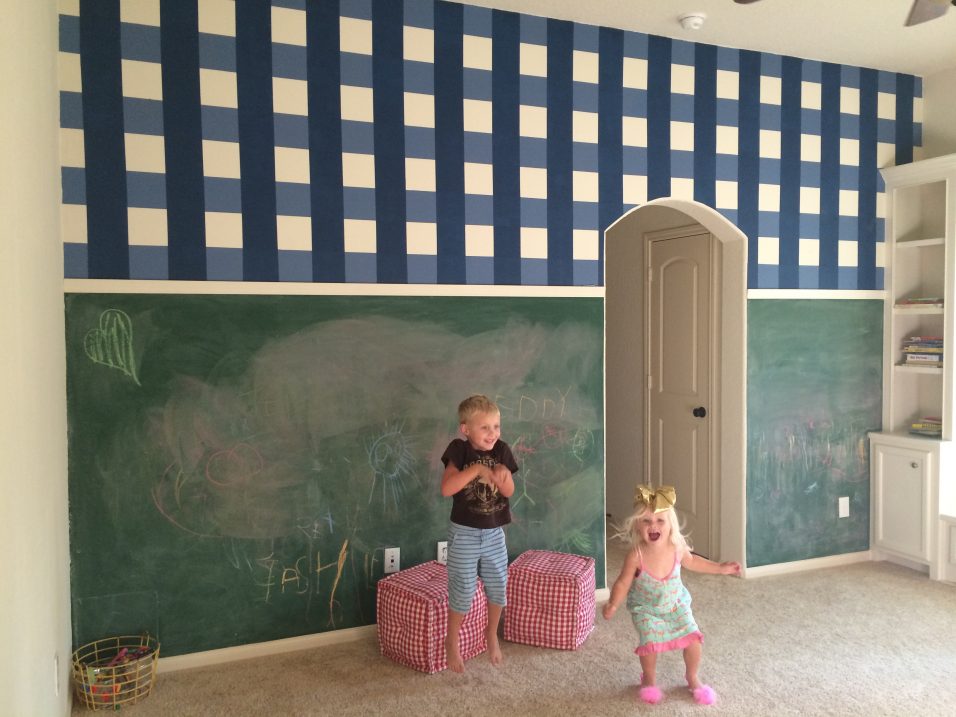
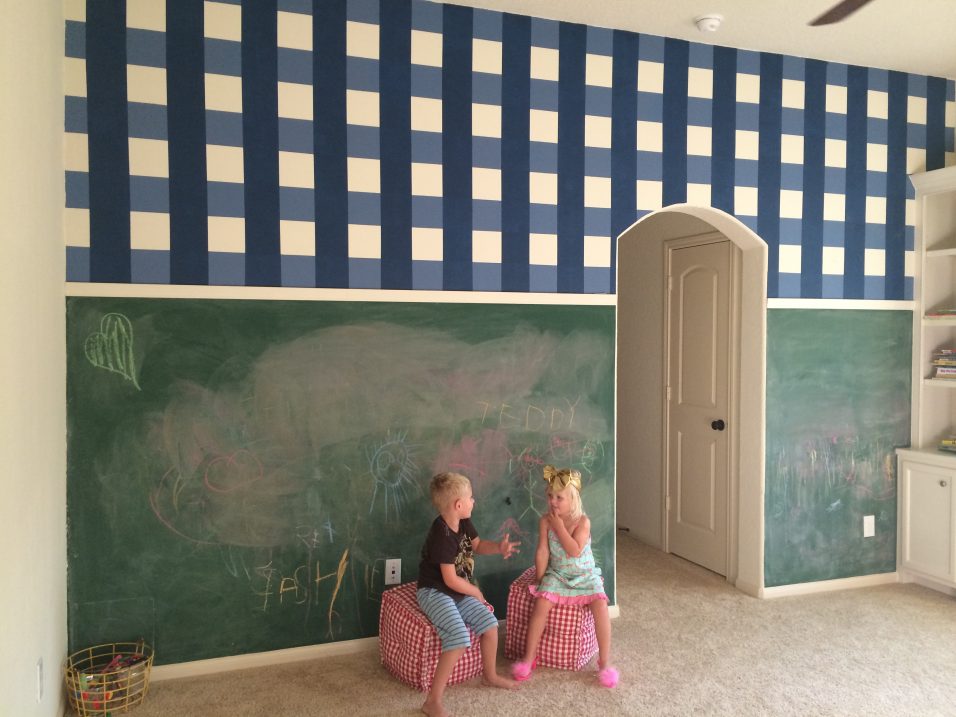
When we decided on the floor plan of our house last year, one of the rooms I was most excited about was the playroom. As soon as we moved in, it was one of the first rooms that I wanted to complete and I quickly set out to do just that. It has become one of the little presidents’ most favorite and most used rooms. They spend a lot of time up there playing.
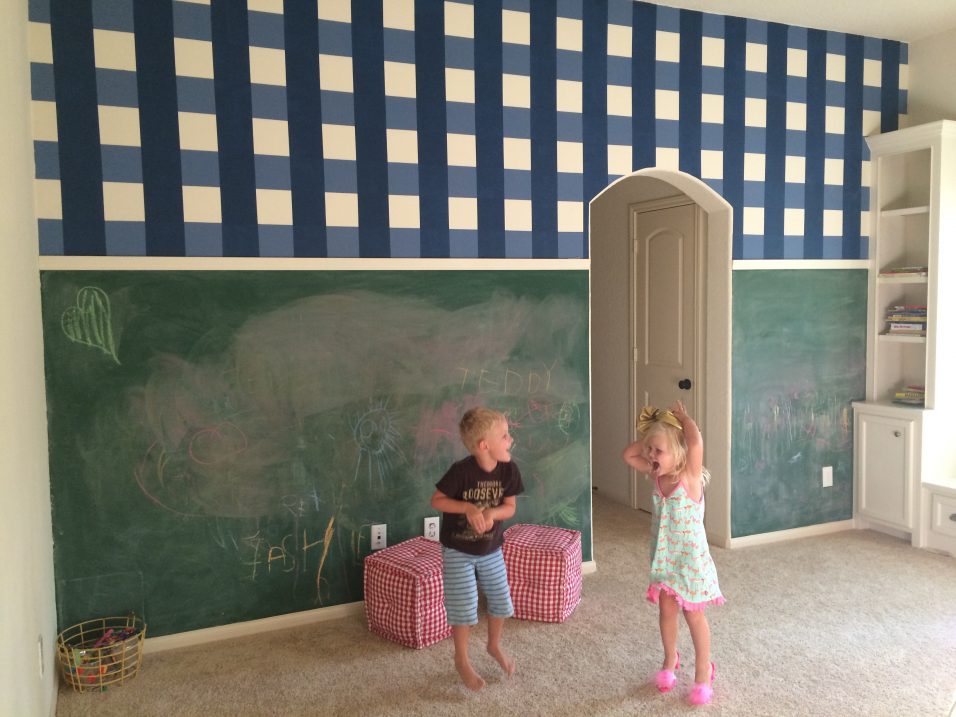
I knew I wanted to do a red, white and blue theme from the start and I knew I wanted a chalkboard wall of some sort. I had originally planned to do a whole wall in chalkboard paint. But, after some thought, I didn’t want a bunch of wasted space at the top. I wanted some sort of statement wall. Enter my love for gingham. I had the idea to do a blue gingham wall and decided to paint it ourselves. I am pretty much in love with how it turned it. It was not the easiest DIY, but now that we have done it and made mistakes along the way, I feel like we could do another gingham wall way easier! This was a complete teamwork project. Mr. Fancy is not a fan of DIY. I am. He humors me and I always rope him into helping. I couldn’t do this one solo, so luckily, I talked him into helping. The outcome is so awesome! I am just in love with it.
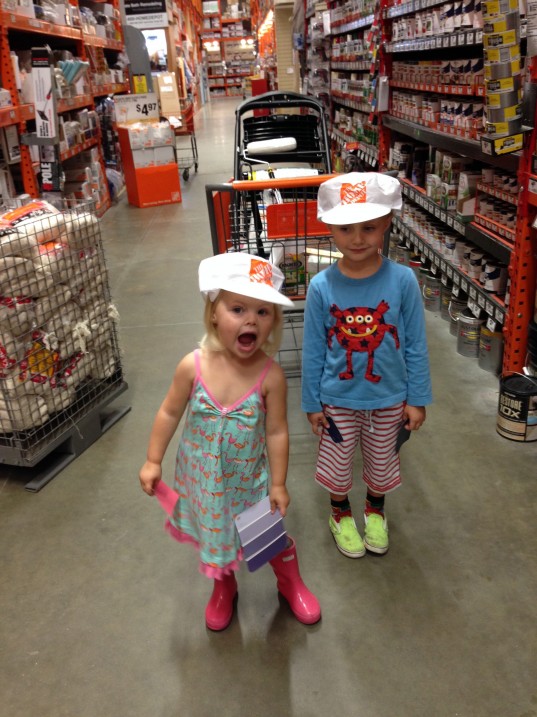
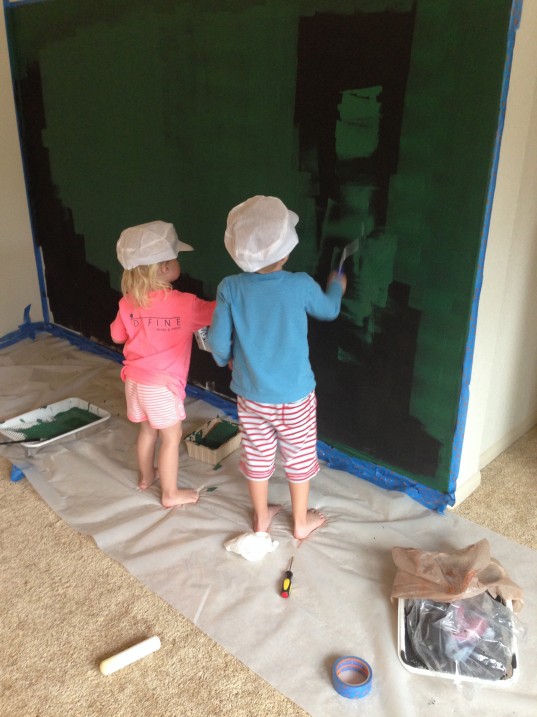
These two were super excited to help too!
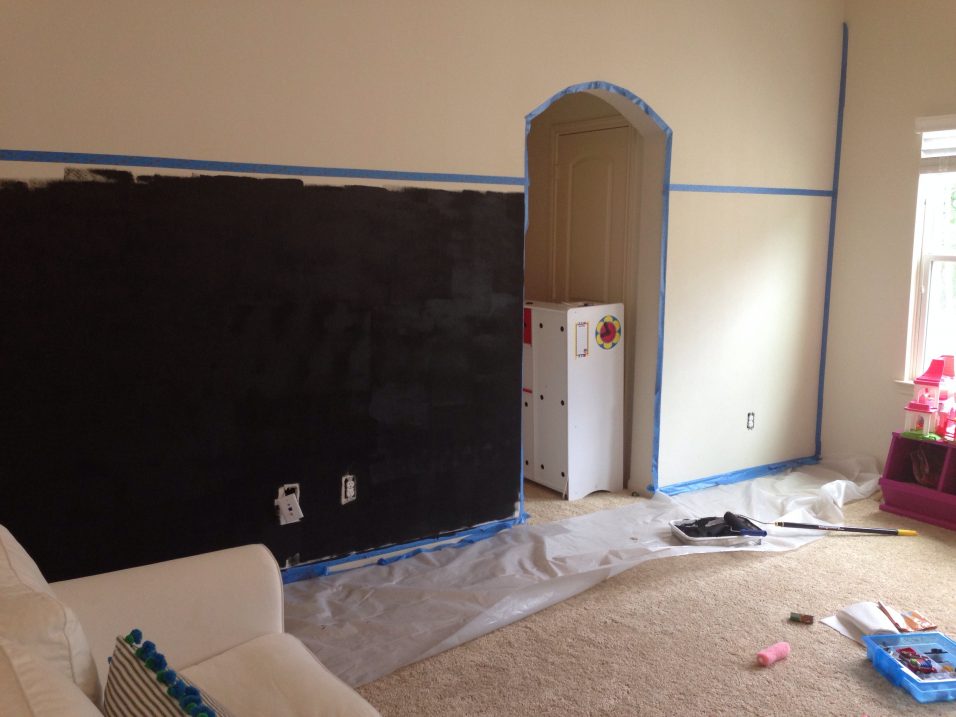
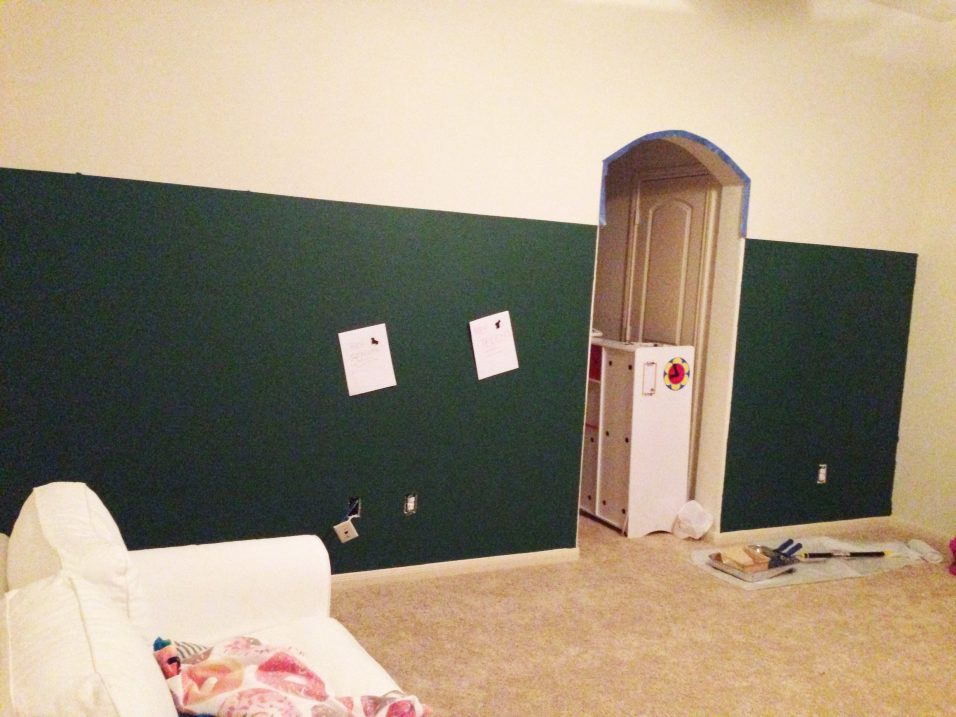
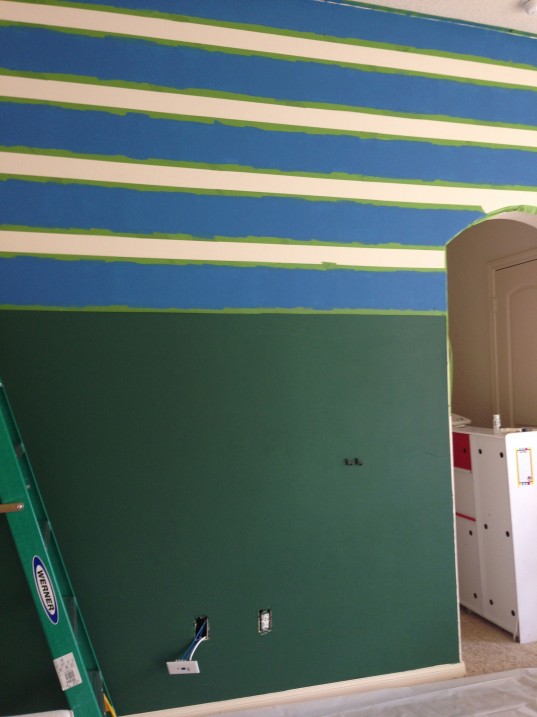
I started off by painting the bottom portion of the wall with a magnetic primer. I wanted to be able to hang things up with magnets and this stuff is pretty darn cool.
Mr. Fancy is super at measuring, so that’s what I rope him in for! Here he is splitting the wall in half for me…this was the easiest part of the measuring process of this DIY.
My wall has a door in the middle of it (that hallway leads to the craft suite!), so we just split the wall in half, all the way across and taped it off.
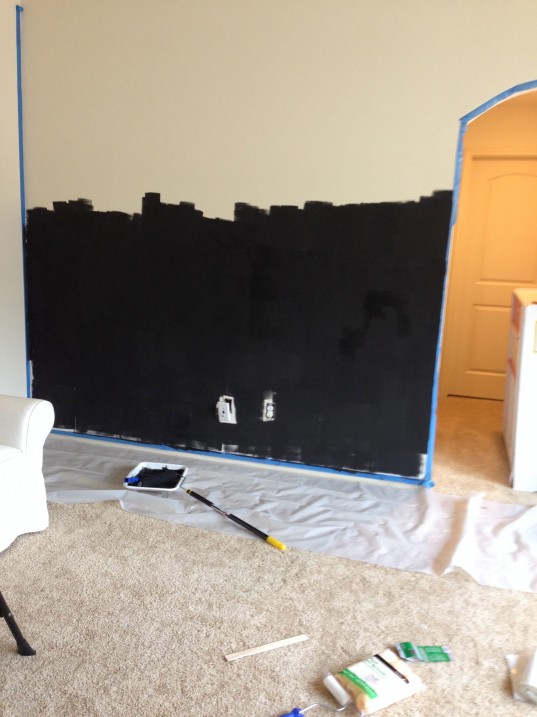
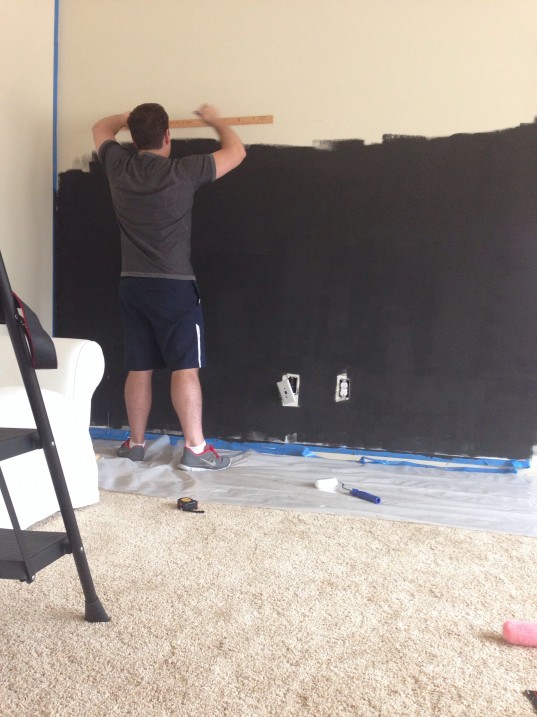
After the primer was dry, we started with the chalkboard paint. We used schoolhouse green. It’s my favorite. These two were super excited to help with this portion of the project.
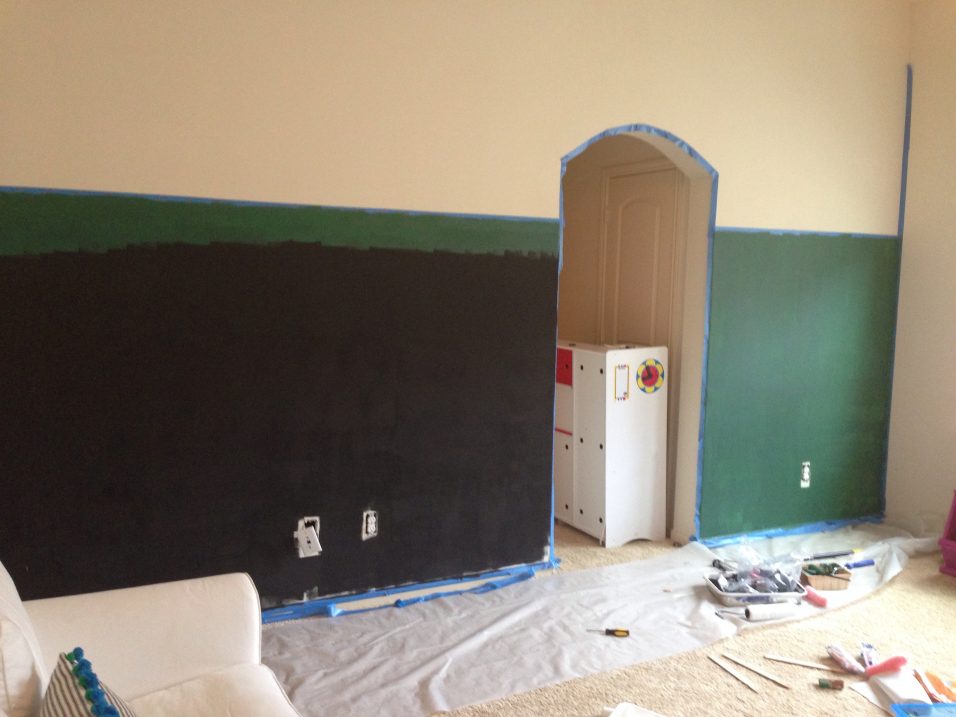
This is the wall after one coat of green.
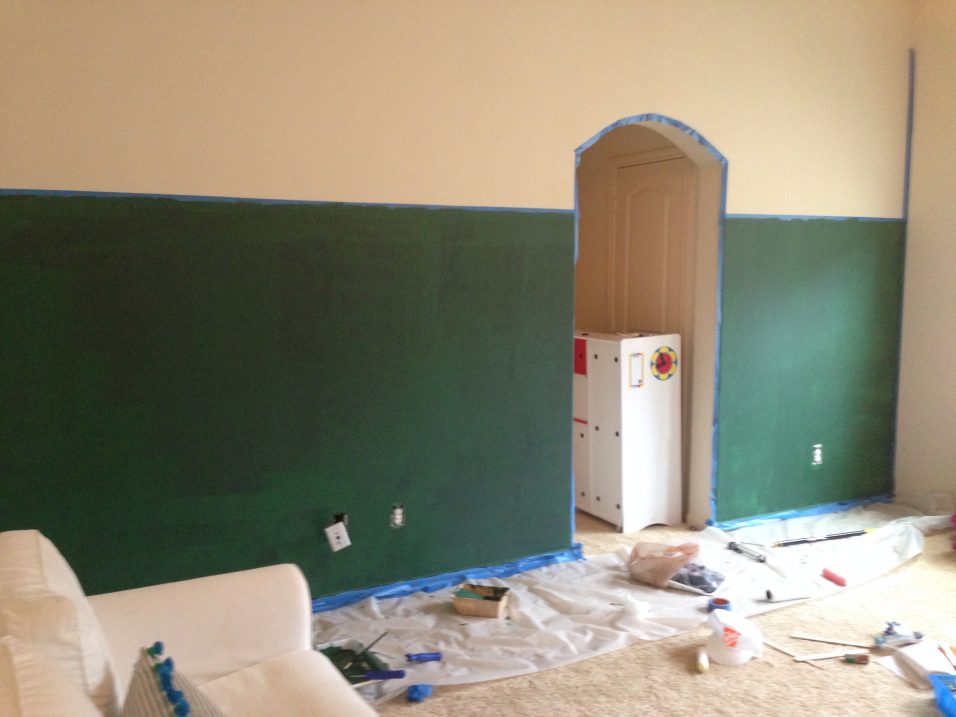
Here it is after the second coat. This was about 11pm. See my little magnets hanging there?!
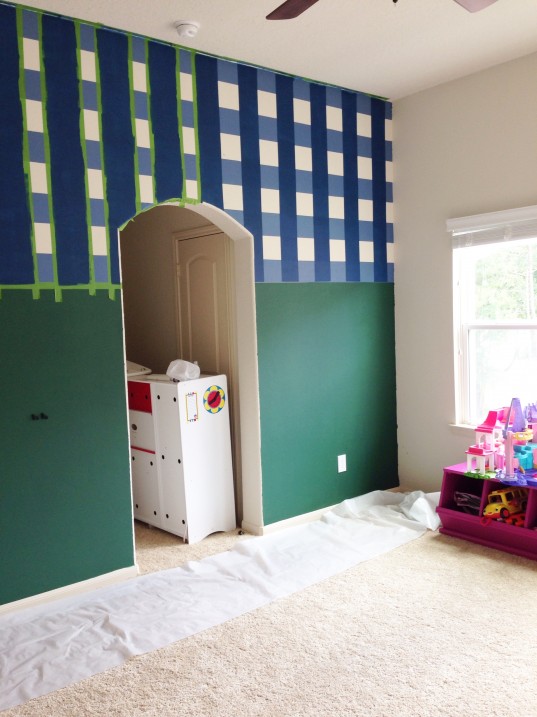
The next morning we began the intense portion of this DIY. It took us a few minutes an hour to agree on a square size for the gingham. We finally decided on 9 inches. I actually can’t even remember why we chose that size at this point. It was Mr. Fancy’s idea to do 9 inches and it turned out perfect…I think he likes a DIY project more than he lets on. Ha! *Each line was 9 inches vertically and horizontally.
The measuring…

And the taping were the most time consuming parts…
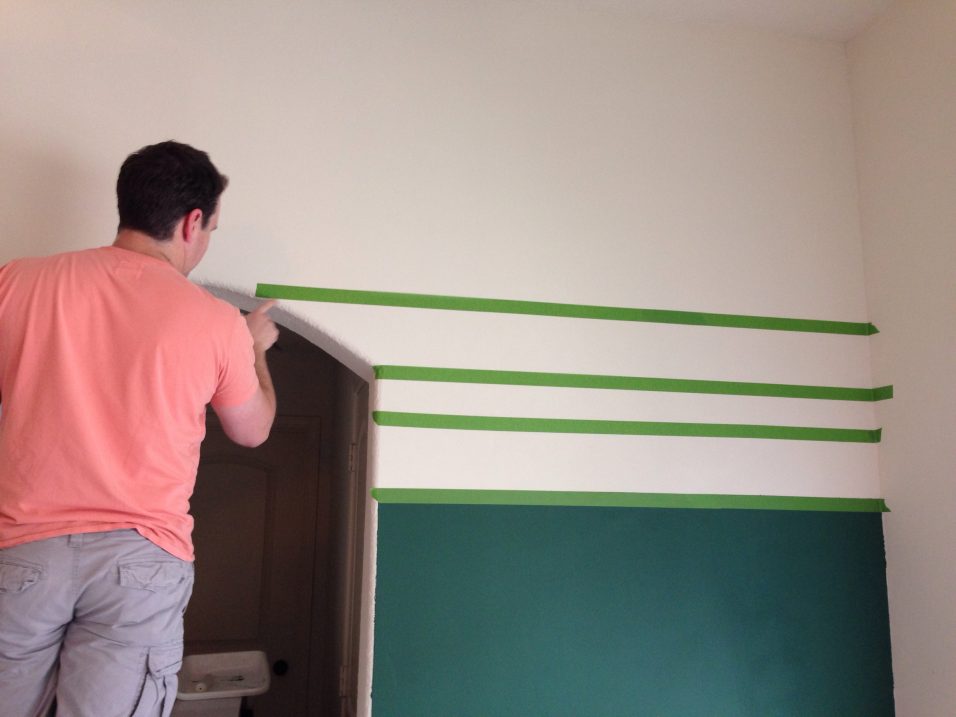
We did the horizontal lines first…Green FrogTape is the best…so much better than the blue tape!
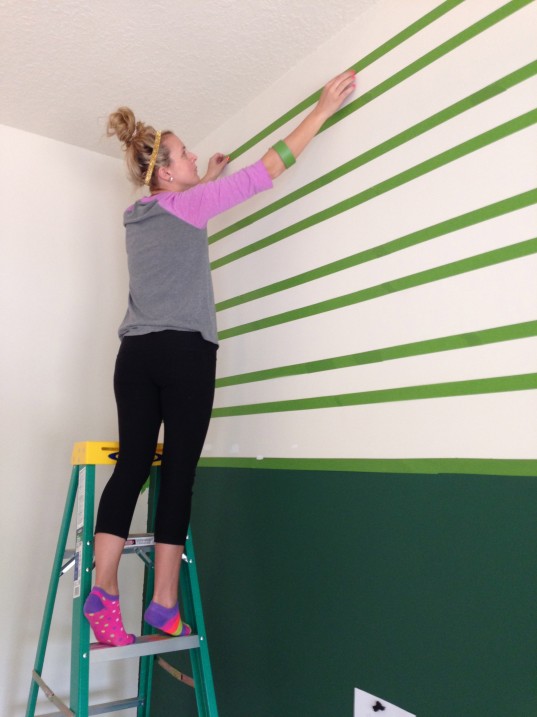
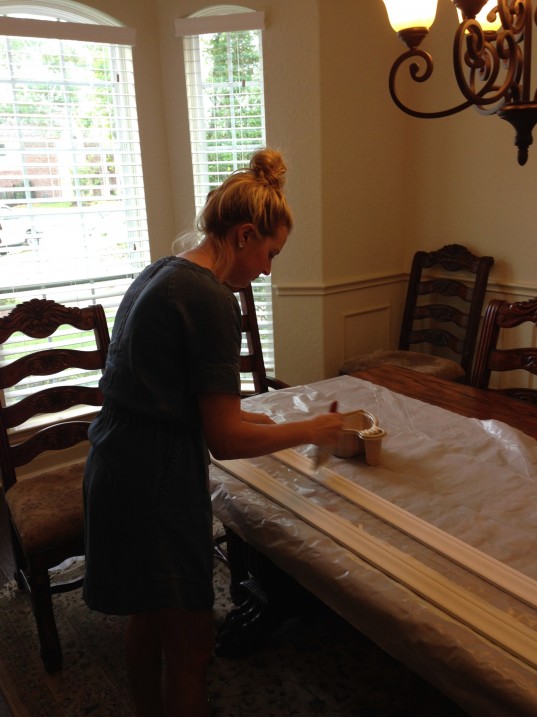
After the whole wall was taped, I got to painting…that was the quickest part!
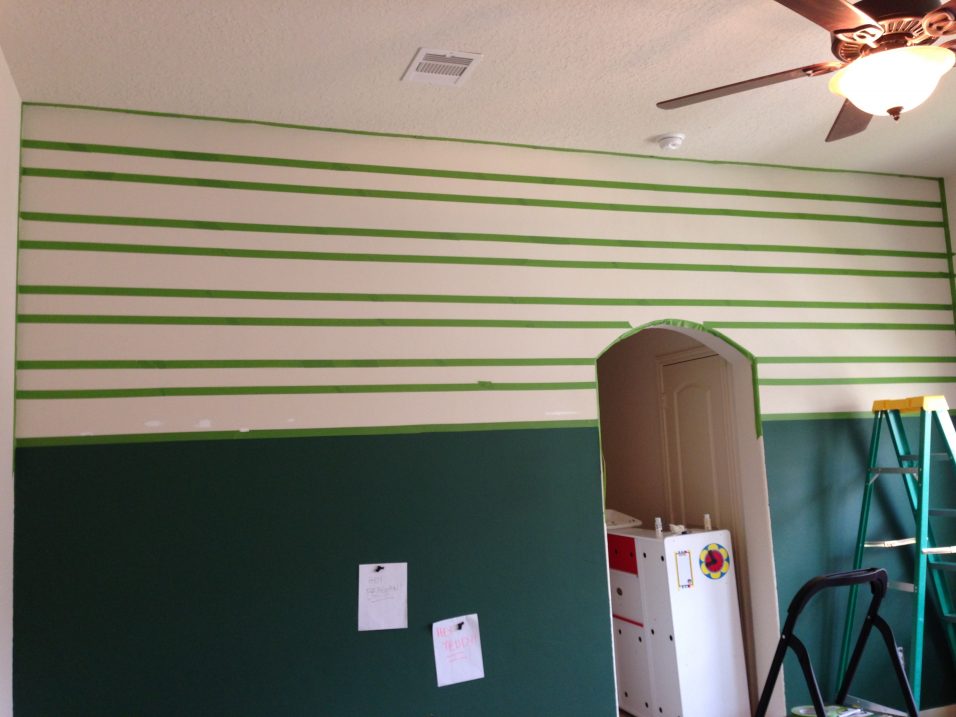
After it dried, we were ready to start taping the vertical stripes.
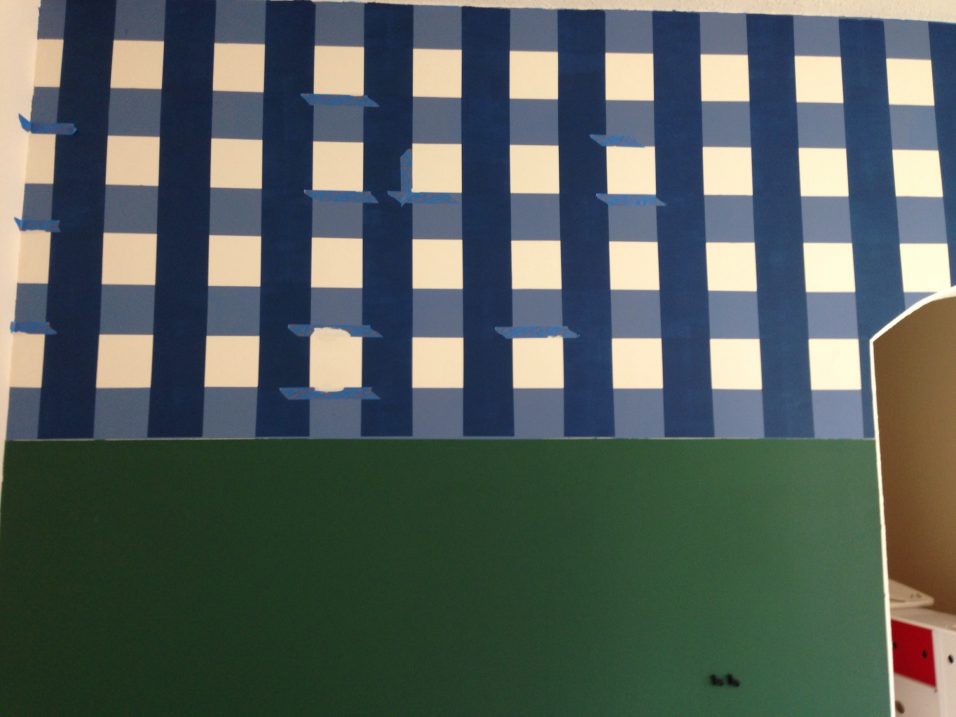
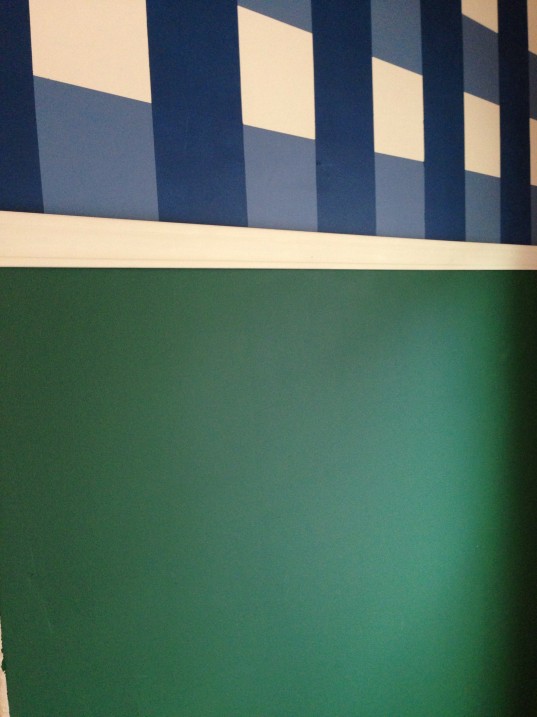
*This blue was NOT the color I was going for, so I painted over it with a different blue that had a primer included in it.
I painted three of the vertical stripes before taping the rest…just to be sure I liked the color. Mr. Fancy measured and taped the vertical lines and I followed right behind him, painting.

Again, painting the lines was just so quick! I tell you, the taping is the longest and hardest part of painting in my opinion.
After the stripes were finished, there were a BUNCH that needed touching up. I just went though and taped areas and used a teeny paintbrush to touch up. I had to run and get our wall color paint, to touch up the white squares as well.
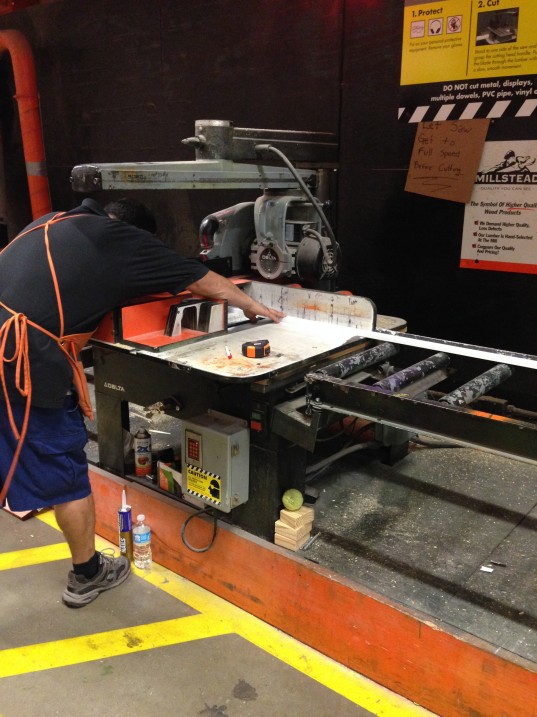
The next part of my plan was to put up a chair rail. This seemed like a daunting task, but I knew I could figure it out and funny enough, this was so simple to do!! So, I headed to Home Depot for the fourth time in three days. This is when I met my new bestie, Rueben. I measured my wall areas, went in, picked a trim piece and he cut them all to size for me! It was so simple and easy! I was telling him that I wanted to buy a bunch of tools, including a nail gun and an electric saw and he said he could not support it until I decided if I was going to be a serious DIYer or not because it was a lot of money to spend. Ha! He had my back!
I headed home and painted my chair rail…
After it was dry, it was ready to go up on the wall. I needed help on this portion of the project, as well. I caulked the backside of the rail and had Mr. Fancy hold it in place, while I nailed it into place. The caulk and the nails hold the rail on there perfectly.

I took a little dab of paint and painted over my nails, so you can’t see them. The chair rail was the perfect finishing touch!
The little presidents are pretty much obsessed with their new playroom (I’m looking forward to sharing more of it soon!)! The chalkboard wall is a huge hit…especially for Reagan, who seems to prefer coloring on walls somedays, rather than on paper! I am seriously so happy with how this project turned out. Halfway through when I had my paint color issue, I wasn’t sure how it would turn out, but the end result is just so great and every time I look at it, I am so proud that we did this ourselves!
a few things to note:
Here is a link to the red Gingham Cubes! We love these and use them for little chairs.
Paint Colors:
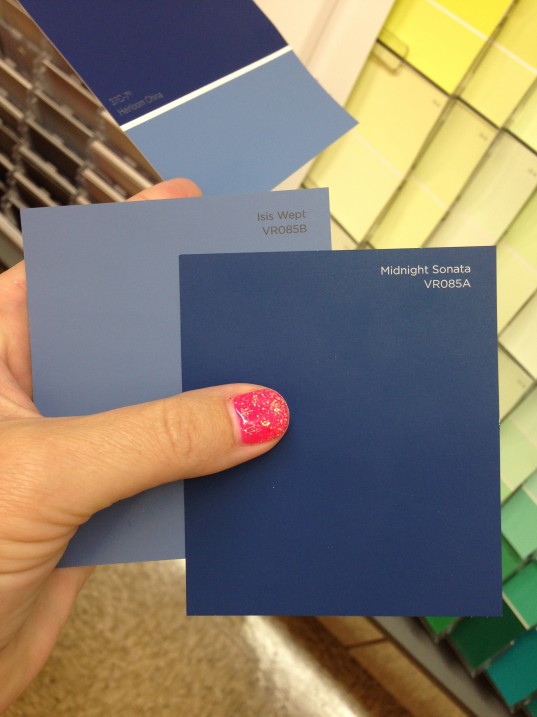
Vertical lines: Valspar Isis Wept
Horizontal lines: Valspar Midnight Sonata
 Chalkboard Paint in Schoolhouse Green
So, there you have it!
So, what do you think? Are you going to attempt your own gingham and chalkboard wall?
If you have any questions at all, please leave me a comment and I’ll be happy to help!


I also love gingham – are you a virgo too? adorable playroom for your little presidents! Wonder if I can convince hubby to do it here? Thanks.
Love the playroom. It looks amazing. Thank you for demonstrating this DIY project.
I just posted our boring playroom today!! I am in LOVE with this wall!! THanks so much for sharing!!
It looks fantastic!! I can’t believe it’s paint and not wallpaper. It’s perfect!! Now I want to see those built-ins!
Ummmm, this is amazing! Seriously, I love everything about this. Nice work Ashley!
Already talked my hubby into a half wall of magnetic chalkboard for our sons room !! Love love love your DIY and creativity
Looks great! The gingham adds so much more than just full chalkboard wall.
Such an amazing DIY and a perfect addition to a playroom. Thanks for the sharing!
Wow it looks amazing ashley! I admire your commitment and skill!!!
It turned out great – so cute. I first thought the gingham was wallpaper before I read the story.
So cute!!! I love it.
This looks awesome!! I love love love the school house green!!!
I love it so much! I don’t think I’ve seen a gingham wall before but now I am obsessed! Thanks for sharing!
It looks awesome!!!! I am trying to find a place for a chalk wall in my house….I think I’ve located one at the foot of the stairs…I”m not going to do the whole wall, just a portion, but I’m super excited!!! The gingham looks great!!!!
Thanks for the Ruby Blue Bow link too…I got Emerson a headband! ITS SO CUTE!!!
I’m in love!!!! Wish I had a wall to do this on. I’m obsessed with gingham and checks!!
love the chalkboard wall! You made the gingham look so easy! I can’t wait to see more of your beautiful house! 🙂
Girl! You are awesome! You have such great style, do you have a backround in interior design? Room looks fab!
We just recently bought a new home and a still settling in…i’m going to cook a fancy pants dinner to convince hubby to help with this DIY in our home! I love love love it! Wish I was as creative as you! You are a true inspiration!
Love, love, love this! I’m wanting to do a chalkboard wall for our little one and love the idea of magnetic primer!
I’d love a peek at your craft suite. Is that where you do your sewing?
Did you remove the texture / refinish your walls? The walls look pretty flat in one picture and I was wondering if you told your contractor not to texture and provide a flat surface. Also, do you find that the area is dusty? We currently have magnetic dry erase wall covering but I prefer the “look” of a chalk board. I may sacrifice the “look” to keep the cleanliness of dry erase. Thoughts???
Hey Ashley-When we looked at new homes here, all the walls were textured, which I am NOT a fan of. I requested that they keep the playroom texture-free (they would not do the whole house texture free) because I knew I would be doing a chalkboard wall in there. The area is not dusty…it gets vacuumed about once to twice a week. They do have dustless chalk which I am thinking of trying. Hope that helps! xo!
Thanks so much!! We are building also and I’m not a fan of texture either. (i know it hides imperfections…but…ugh…) I’m glad to know that dustless chalk exists. That might be the deciding factor to switch from dry erase to chalk board in the new house. Thanks again!!!
What type of camera do you use?
Ashley…this wall really looks amazing! Would love to try this in a kid room! My home to-do list is already a page long – it will take some convincing to get keith to attempt this one!
What a great room! You all should be real proud! Your many talents continue to awe me! love to all!
WOW! This is impressive. My husband and I enjoy DIY but this may even be too intense for us. 🙂 (I hate taping!) absolutely ADORABLE!